Students often refer to Class 7 Maths Notes and Part 2 Chapter 6 Constructions and Tilings Class 7 Notes during last-minute revisions.
Class 7 Maths Chapter 6 Constructions and Tilings Notes
Class 7 Constructions and Tilings Notes
Geometric Constructions
In our previous class, we have already studied the use of geometrical instruments like ruler, protractor, compass, pair of set-squares etc.

A ruler is used to draw and measure straight line segments.
A protractor is used to draw and measure angles.
A compass is used to draw circles.
Geometric constructions are made using the above instruments.
In our discussion, we shall consider the following types of geometric constructions:
- Eyes
- Construction of a perpendicular bisector.
- Construction of a 90° angle at a given point.
- Construction methods in the Sulba-Sutras.
- Angle bisection for a design.
- Repeating units and repeating angles.
- Construction of a line parallel to the given line.
- Arch designs.
- Regular hexagons.
- Related constructions.
In this chapter, we shall use only two geometric tools—an unmarked ruler and a compass for all geometric constructions unless there is a need for drawing lines of specific lengths in standard units.
1. Eyes
A rough figure of eyes is given below:

In both eyes, the arcs should be similar, and in each eye, the upper and lower arcs should be symmetrical.
![]()
(i) Method of drawing an eye
Take any two points A and B on a vertical line.
Choose a distance ‘k’ which is slightly greater than half of the distance AB.
With centres at A and B, draw arcs of radius k.

Let the arcs intersect at X and Y.
Here, we have AX = AY = BX = BY (= k).
At the mid-point of MN, draw a small black dot.
Since radii AX and BX are equal, the line XY is the line of symmetry of the arcs.
The figure bounded by the arcs is the required eye.
The line of symmetry XY is called the supporting line of the eye.
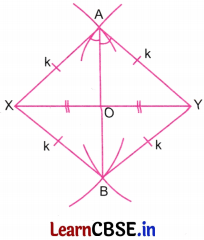
(ii) Method of drawing an eye with a given supporting line
Let XY be the given supporting line of an eye.
Choose a distance ‘k’ which is slightly greater than half of the distance XY.
With centres at X and Y, draw arcs above and below XY of radius k.
Let the arcs intersect at the points A and B.

In the Figure, join A and B. Let AB intersect XY at O. Join AX, AY, BX, and BY.
Consider ∆ABX and ∆ABY.
Here, AX = AY, BX = BY, and AB is common to both triangles.
∴ By the SSS rule, ∆ABX and ∆ABY are congruent.
∴ ∠XAB = ∠YAB
i.e., ∠XAO = ∠YAO
Consider ∆AOX and ∆AOY.
Here, AX = AY, ∠XAO = ∠YAO, and OA is common to both triangles.
∴ By SAS rule, ∆AOX and ∆AOY are congruent.
∴ OX = OY …….(1)
and ∠AOX = ∠AOY ……(2)
⇒ O is the mid-point of XY.
We have ∠AOX + ∠AOY = 180°
∴ ∠AOX + ∠AOX = 180° [Using (2)]
⇒ 2∠AOX = 180°
⇒ ∠AOX = 90°
∴ ∠AOX = ∠AOY = 90°
∴ Line AB is perpendicular to XY.
∴ Line AB is the perpendicular bisector of the supporting line XY of the eye.

Line AB is used to draw an eye with the supporting line XY.
Take points M and N on AB such that OM = ON.
With radius equal to MX, draw arcs with centres at M and N.
At the point O, draw a small black dot.
The required eye is shown in the Figure.
(iii) Method of drawing eyes of different shapes
Let XY be the supporting line of an eye.
Construct the perpendicular bisector AB of the line AY.
Let these lines intersect at O.
We know that an eye can be constructed by drawing arcs from points on AB, equidistant from the point O.
Eyes of different shapes can be drawn by choosing points on AB that are at equal distances from O.
This is shown in the Figure below:

2. Construction of Perpendicular Bisector
A line that bisects a given line and is perpendicular to it is called the perpendicular bisector of the line.
In the given figure, CD is the perpendicular bisector of the line AB.

Activity: Given a line segment, construct its perpendicular bisector using only an unmarked ruler and a compass.
Draw a line segment AY, using an unmarked ruler. Choose a distance ‘k’ which is slightly greater than half of the distance AY.
With centres at X and Y, draw arcs using a compass above and below AY of radius k.

Let the arcs intersect at the points A and B.
Join A and B. Let AB intersect AY at O.
Join AX, AY, BX, and BY.
∆ABX and ∆ABY are congruent because AX = AY, BX = BY, and AB is common.
∴ ∠XAO = ∠YAO
∆AOX and ∆AOY are congruent because AX = AY, ∠XAO = ∠YAO, and OA is common.
∴ OX = OY and ∠AOX = ∠AOY
Also, ∠AOX + ∠AOY = 180°
∴ 2∠AOX = 180° or ∠AOX = 90°
∴ OX = OY and ∠AOX = ∠AOY = 90°
∴ AB is the perpendicular bisector of the given line AY.
This method of constructing the perpendicular bisector of a line is not only geometrically exact but also a practical way to construct it correctly.
![]()
3. Construction of a 90° Angle at a Given Point
In this section, we shall learn to use the method of constructing a perpendicular bisector to construct a 90° angle at any point of a given line.
Activity: Given a line segment, construct a 90° angle at a given point on the given line.
Draw a line segment AB. Let O be a point on AB. We shall construct a 90° angle on AB at O. Extend the line AB on both sides of AB. Using a compass, mark two points X and Y at equal distances from O, so that O is the mid-point of XY.

With centres at X and Y, draw arcs using a compass of radius greater than the distance OX.
Let the arcs intersect at the point P. Join O and P.
The line OP is the perpendicular bisector of the line segment XY.
∴ The line OP makes an angle of 90° with the line AB at the point O.
The radius of the arcs with centres X and Y should be greater than OX; otherwise, the arcs will not intersect at any point.
4. Construction Methods in Sulba-Sutras
The name Sulba-Sutras combines Sulba (rope or cord) and Sutras (rules). Thus, Sulba-Sutras literally means ‘rules of the rope’.
Sulba-Sutras are the ancient geometric texts dealing with the construction of fire altars required for Vedic ceremonies. These texts also demonstrate a sophisticated understanding of geometry and arithmetic.
The Sulba-Sutras also contain the methods of constructing a perpendicular to a line and the perpendicular bisector of a line.
Activity: Given a line segment drawn on the ground, construct its perpendicular bisector using Sulba-Sutras.
Let XY be the given line segment drawn on the ground. Fix small poles vertically into the ground at the end points X and Y.
Take a rope which is longer than XY. Make loops at end points of this rope. Now fold the rope into half such that the loops are together. Mark the mid-point of the rope.
In the next step, fasten the loops at the ends of the rope to the poles at X and Y.
Now hold the rope at the mid-point and pull the rope above XY such that the two parts of the rope on either side are fully stretched. Mark this position of the midpoint as A.

Next, hold the rope at the mid-point and pull the rope below XY such that the two parts of the rope on either side are fully stretched.
Mark this position of the midpoint as B. Draw a line joining A and B.

In the above figure AB is the required perpendicular bisector of the given line segment XY.
5. Angle Bisection for a Design
In this section, we shall discuss the method of bisecting a given angle.
Let ∠XOY be any angle. With centre at O, draw an arc intersecting the lines OX and OY at A and B respectively.
With centres at A and B, draw arcs of same radius so that the arcs intersect at a point, say C. Join AC, BC and OC.

We have OA = OB, AC = BC.
In ∆OAC and ∆OBC, we have OA OB, AC BC and OC is common.
∴ ∆OAC ≅ ∆OBC (Using SSS rule)
∴ ∠AOC = ∠BOC
∴ Line OC is the bisector of the given angle ∠XOY.
![]()
Example:
Construct the figure given below.

Solution:
There are 8 petals in the figure.
We have \(\frac{360^{\circ}}{8}\) = 45° and 45° = \(\frac{90^{\circ}}{2}\)
∴ By bisecting a right angle, we shall get an angle of 45°.
Draw a line AB. With centres at A and B, draw arcs of equal radii above and below the line AB.
Let the arcs intersect at points C and D. Join C and D.

Let AB and CD intersect at the point O.
Draw the bisectors of ∠BOC, ∠COA, ∠AOD, and ∠DOB.
Draw a circle with centre at O. Draw dots at the points of intersection of the circle with the lines.
Using these dots, draw the required design. In the next step, we erase the extra lines and arcs.
The above figure looks like as given below:

This is the required figure.
6. Repeating Units and Repeating Angles
In this section, we shall learn the method of creating a copy of a given angle using only a ruler and compass.

Let ∠ABC be any given angle.
Draw a line XY. With centres at B and X, draw arcs of equal radius.

Let the arc intersect AB and BC at D and E respectively.
Let the arc intersect XY at P.
Measure DE using a compass.
Transfer this length on the arc from P to get PQ = ED.
Join X and Q, we have XP = XQ = BE = BD and PQ = ED.
In ∆PXQ and ∆EBD, we have XP = BE, XQ = BD, and PQ = ED.
∴ ∆PXQ ≅ ∆EBD (Using SSS-rule)
∴ ∠PXQ = ∠EBD
∴ ∠YXR = ∠CBA
∴ ∠YXR is a copy of the given angle ∠CBA.
In figures involving repeating units and repeating angles, there is a single unit repeating itself.
Thus to make such a figure, we are required to make exact copies of the repeating unit.
For example, consider the following figure:

In this figure, there is a single unit which is repeating seven times and in different orientations.
In order to construct above figure, we shall require copies of the following units:

With the knowledge of constructing an angle equal to a given angle, we can make number of copies of the repeating unit.
7. Construction of a Line Parallel to the Given Line
In this section, we shall learn the method of drawing a line parallel to a given line by using only a ruler and a compass.

We know that when a transversal makes equal corresponding angles with two lines, then the lines are parallel to each other.
In the figure, the transversal makes equal corresponding angles ∠1 and ∠2.
Here the lines are parallel to each other.
![]()
Activity: Draw a line parallel to a given line using only a ruler and a compass.
Let l be the given line. We shall draw a line parallel to the line l.
Draw a line m intersecting the given line l.
Let line m intersect line l at A and inclined to l at an angle ∠a.
Choose a point B on the line m from where we intend to draw a line parallel to the given line l.

With centres at A and B, draw arcs of equal radius. Measure EF using a compass.
Transfer this length on the arc from C to get CD = EF.
Join B and D and extend this line on both sides.
Let the arc CD make angle ∠b.
In the above figure, the transversal m intersects the lines l and n and the corresponding angles ∠a and ∠b are equal.
∴ The lines l and n are parallel to each other.
Thus, the line n is drawn parallel to the given line l only by using a ruler and a compass.
8. Arch Designs
A trefoil arch is an arch incorporating the outlines of three overlapping circles.

Trefoil arches are used for its symbolic significance in Christian architecture.
Example:
Construct the given arch shape on a piece of paper.

Solution:
The given arch contains one semicircle and two arcs.
Here ∠BAD and ∠CDA are equal angles. Also, AB = CD.
Draw a line and take points A and D on this line.
With centres at A and D, draw arcs of equal radius.

With centres at P and Q draw arcs of equal radius intersecting the arcs at R and S respectively. Join AR, DS, and RS.
Using arcs of equal radius with centres R and S, find the mid-point of RS.
Let Mbe the mid-point of RS. With centre at Mand radius MS, draw a semicircle above the line RS.
Draw arcs of same shape on AR and DS.
Erase the extra letters, lines and arcs to get the required arch.
A pointed arch is an arch with sharp apex, formed by two curved sides that meet at a point.

9. Regular Hexagons
We recall the following facts:
- A regular polygon has equal sides and equal angles.
- A regular polygon with 3 sides is an equilateral triangle.
- A regular polygon with 4 sides is a square.
- A regular polygon with 5 sides is a regular pentagon.
- A regular polygon with 6 sides is a regular hexagon.

10. Related Constructions
1. Construction of 30° and 15° angles
Draw a line AB. With centre at A, draw an arc.
Let the arc intersect AB at C.
With centre at C, draw an arc of same radius as of previous arc.
Let the arcs intersect at D. Join AD and extend it to E.

With centres at C and D, draw arcs of same radius.
Let these arcs intersect at F. Join AF and extend it to G.
∠BAE = 60° and AG is the bisector of the angle ∠BAE.
∴ ∠BAG = \(\frac {1}{2}\)(60°) = 30°.
Now, we shall find the bisector of ∠BAG.
With centres at C and H, draw arcs of same radius.
Let these arcs intersect at I. Join AI and extend it to J.
AJ is the bisector of the angle ∠BAG, which is equal to 30°.
∴ ∠BAJ = \(\frac {1}{2}\)(30°) = 15°.
![]()
2. Construction of 6-pointed Star
Draw a horizontal line. Take points A and B on it.
We shall first construct a regular hexagon with side length AB.

With centres at A and B, draw arcs of equal radius.
With centres at C and D, draw arcs of same radius as was for earlier arcs.
Let the arcs intersect at the points E and F. Join His and extend it.
Take point G on it so that AG = AB.
Join B and F and extend it.
Take point H on it so that BH = AB.
With centres at G and H, draw arcs of equal radius.
With centres at I and J, draw arcs of same radius as was for earlier arcs.
Let the arcs intersect at the points K and L. Join G and K and extend it.
Take point Mon it so that GM = AB.
Join H and L and extend it.
Take point N on it so that HN = AB. Join M and N.
Here ABHNMG is a regular hexagon with side length AB.
Extend the sides of the hexagon on both sides to intersect each other at the points O, P, Q, R, S, and T.
Erase the extra lines and arcs to get the required 6-pointed star.
Here the six triangles forming 6 points of the star- ΔAOB, ΔBPH, ΔHQN, ΔNRM, ΔMSG, and ΔGTA are all equilateral triangles.
By using the property of vertically opposite angles, each angle of these triangles is 60°.
Also, each side of each triangle is equal to AB.
So, all triangles are equilateral triangles.
Tiling
1. Tangrams
Tangrams are Chinese geometric puzzles. These puzzles make use of seven pieces obtained by dividing a square as shown in the figure. These seven pieces obtained by dividing a square are:

2 large right triangles
1 medium right triangle
2 small right triangles
1 square
1 parallelogram

All the above seven pieces fit together to form a perfect square. This is called the original tangram based shape. The above given seven pieces are called tans. Tangrams are puzzles involving the arrangement of the complete set of seven tans to form wide variety of figures—animals, people, objects and geometric patterns. In tangrams, all seven tans are to be used without overlapping to recreate the given shape.
Rules for tangram puzzles
- All seven tans must be used to form the target shape.
- Pieces must lay flat on the surface.
- Pieces must not overlap.
- Pieces must touch (edge-to-edge) to form a single composite shape.
- Pieces can be rotated and flipped to fit the target shape.
2. Tiling
The covering of a flat surface, using one or more geometric shapes, called tiles, with no gaps and no overlaps is called tiling.
Thus, tiling is a pattern made by repeating shapes that fit together perfectly to cover a flat surface and each shape is called a tile.
Tiling can be done on a specific plane surface and also on an entire plane surface.
- Tiling on a specific plane grid
- Tiling on a specific plane grid using black and white grid
The tiling work of a specific plane grid, containing small squares, by 2 × 1 tiles can be simplified by using a black and white grid as follows.
We create a similar problem by considering black and white small squares in the given grid so that black squares have only black neighbours and white squares have only white neighbours. The 2 × 1 tiles are also taken as half black and half white.
![]()
In the black-and-white grid, the problem is to tile the region with the 2 × 1 black-and-white tiles so that each black square of a tile sits on a black square of the grid and each white square sits on a white square.
If a plain grid is tileable then its corresponding black-and-white grid is also tileable. Conversely, if a black-and-white grid is tileable then its corresponding plain grid is also tileable.
A division of a line segment, or any geometrical quantity, into two identical parts is called bisection. Any point that is of equal distance from the two endpoints of a given line segment lies on its perpendicular bisector. This property can be used to construct the perpendicular bisector using a ruler and compass. The method of constructing the perpendicular bisector can be modified to draw a 90° angle at any point on a line using only a ruler and compass. An angle can be bisected and copied using the congruence properties of triangles. A 60° angle can be constructed using a ruler and compass by constructing an equilateral triangle. Covering a region using a set of shapes, without gaps or overlaps, is called tiling.
The post Constructions and Tilings Class 7 Notes Maths Part 2 Chapter 6 appeared first on Learn CBSE.
from Learn CBSE https://ift.tt/FwPbIyK
via IFTTT
No comments:
Post a Comment