Include Kaushal Vikas Class 9 Solutions and Class 9 Vocational Education Chapter 6 Construction Notes in your preparation plan to revise efficiently.
Class 9 Kaushal Vikas Chapter 6 Notes
- Construction is the process of building structures that people use in daily life for living, working and protection from weather like heat and rain.
- In earlier times, humans lived in caves and later started making simple houses by using mud, grass, wood and stones.
- As time passed, they began using stronger materials like bricks, cement, iron and steel to build more durable houses.
- With the growth of villages into towns and cities, the need for more buildings increased, leading to the construction of multi-storey buildings along with schools, hospitals, roads, bridges and factories.
- Today, construction uses both modern tools and machines along with traditional skills to build different types of structures that support daily life and development.
Basic Elements of Building Construction
Every building construction has the following basic structural elements
- Foundation: It supports the entire building. A strong foundation prevents cracks and protects against earthquakes. Depth depends on the load.
- Walls: They are made of bricks, stones, cement panels, wood or bamboo. They enclose space and support the roof.
- Beams: They are the horizontal elements that carry the load of upper floors (slabs). The beam size depends on the load.
- Columns: It is the vertical elements that support beams and transfer the building’s weight to the foundation.
- Roofs: It is the upper element of a building. It is built using rafters and trusses to support the roof load and provide weather protection.
- Windows and Doors: These are structural openings that provide entry, ventilation, natural light and aesthetic appeal.
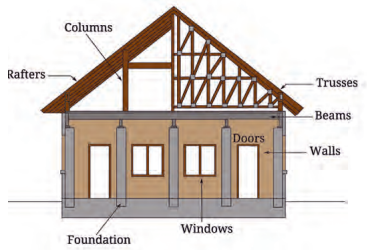
Figure: Basic elements of buildings
Types of Housing Construction
House construction depends on how the weight of the building is supported and based on this it is divided into two main types
1. Load Bearing (Wall-Bearing) Construction
- The walls themselves carry the weight of the roof and upper floors and transfer it to the ground.
- These are used for single-storey houses where deep foundations are not needed.
- These houses are simple, less expensive and easy to repair.

Figure: A single-storey house showing the load bearing construction

2. RCC (Reinforced Cement Concrete) Construction
- The building stands on a strong skeleton of columns and beams made of concrete and steel.
- The load is transferred through the frame, not through the walls.
- These are used for multi-storey buildings that need to be strong and earthquake-resistant.

Figure: A multi-storey building showcasing RCC construction
Process Chart
Scoping Work
Deciding the scope of work means planning and making important decisions before starting any construction activity. It helps ensure that the work is useful, feasible and can be completed safely and efficiently. The following points help in planning it properly
- Structure to be Constructed: This involves deciding the type of structure to be built based on the needs of the school or community. Examples include a boundary wall, ramp, shed, pavement or wash basin.
- Material and Resource Availability: It is important to check whether the required materials and tools such as bricks, sand, cement, gravel, water or recycled materials are available. Cost, safety and ease of handling should also be considered.
- Usefulness of the Structure: The planned structure should serve a clear purpose and be beneficial for the school or community. It should solve a problem or meet a specific need.
- Location of Construction: The place where construction will occur must be carefully chosen. Factors like available space, safety, accessibility and ease of transporting materials and tools should be considered.
Making a Process Chart
- A process chart is prepared to list the key tasks involved in construction along with the estimated dates for completing each task.
- It helps in planning and monitoring the work systematically, ensuring the construction is completed on time.
Sample Process Chart for Construction
| Tasks for Construction | Dates | Responsibility |
| Preparing the construction drawing | ||
| Marking the drawing on the field (line out) | ||
| Preparation of foundation | ||
| Brick work | ||
| Curing (process to strengthen the construction) | ||
| Plastering | ||
| Finishing and Painting |
Making a Technical Drawing of the Selected Structure
- The designer (architect) and the builder (mason/engineer) may be different people but technical drawings help communicate the exact plan.
- Technical drawings show the side view, top view (plan) and front view (elevation) of the structure.
- A scale is used to show actual dimensions in a smaller size on paper.
Example of Scale in Technical Drawing
| Actual Size | On Paper Dimension | Scale to be Written as 1:XX (1 unit on paper : XX unit on the field) |
| 10 m (1 m on field = 1 cm on paper) | 10 cm | 1:100 (1 cm on paper = 100 cm on field) |

Figure: Elevation, Side view and Plan of a ramp
Technology and Artificial Intelligence
- Computer-Aided Design (CAD) software helps in developing technical drawings quickly and accurately and it allows easy editing and reworking of drawings without starting over.
- CAD enables the creation of 2D and 3D views, helps decide exact measurements and scale and supports better planning for the use of materials, reducing waste.
- CAD drawings can be easily stored and shared as soft copies and online software and tutorials can be used to learn and create technical drawings efficiently.
Selecting Materials
- Selecting materials depends on the type of structure being constructed. In construction work, materials such as bricks, cement, sand, gravel, steel, wood and water are commonly used and the selection is done with guidance from a teacher or expert.
- The following table shows different materials, their uses and safety precautions
Materials used for Construction
| Material | Use | Safety Note |
| Bricks | Building walls and partitions | Stack properly and handle gently to avoid injury. |
| Cement | Binding material to hold bricks and stones together | Avoid contact with skin/eyes and store in dry place. |
| Sand | Mixed with cement to make mortar and concrete | Avoid inhaling dust and wear a mask. |
| Gravel | Mixed with cement and sand to make strong concrete | Lift sacks carefully and use gloves. |
| Water | Mixing cement and for curing | Prevent spills to avoid slipping. |
| Paint | Finishing and protecting walls | Use in ventilated area and wear mask. |
| Lime | Plastering and whitewashing | Avoid contact with eyes and wear gloves. |
Difference between Mortar and Concrete
| Basis | Mortar | Concrete |
| Meaning | Mortar is a mixture used in construction for binding building materials together. | Concrete is a strong construction material used for making structural elements. |
| Composition | Mortar is made by mixing cement, sand and water. | Concrete is made by mixing cement, sand, gravel (aggregate) and water. |
| Main Use | Mortar is used for joining bricks, fixing stones and laying tiles. | Concrete is used for constructing foundations, roads, ramps and structures. |
| Strength | Mortar is comparatively less strong. | Concrete is much stronger than mortar. |
| Function | Mortar mainly works as a binding material. | Concrete provides strength and support to buildings and structures. |
| Example Use | Mortar is used in brick masonry and tile work. | Concrete is used in buildings, bridges and roads. |

Selecting Tools
Tools are selected based on the type of construction task. Modern AI and technology-based tools like robots for brick-laying and demolition, light amplification by stimulated emission of laser scanners to detect faults in buildings are used.
Tools Used for Construction
| Tool | Use | Safety Note |
| Trowel / Kami / Thappa | Lifting, spreading and smoothing cement or mortar | Hold firmly and avoid sharp edges. Clean after use. |
| Hoe | Loosening soil, mixing sand and cement, levelling surface | Use with proper grip and keep distance from others. |
| Wooden Float | Smoothing and finishing plastered walls and floors | Use with dry hands and avoid slipping on wet surfaces. |
| Metre Tape | Measuring length, width and height of structures | Retract slowly to avoid finger injury. |
| Wire Brush | Removing rust and dirt; smoothing rough surfaces | Use face shield and gloves for protection against flying debris. |
| Spirit Level | Checking if a surface is horizontal or vertical | Handle gently to avoid breaking the glass tube. |
| Plumb Bob | Checking if a wall or pillar is perfectly vertical | Do not swing near others. Hold string firmly. |
| Water Level Tube | Checking horizontal level using a water-filled transparent tube | Keep ends secured to avoid spillage. |
| Chisel | Cutting bricks, shaping stone, removing extra cement | Hold firmly and keep fingers away from cutting edge. |
| Hammer | Striking chisel, breaking bricks, fixing nails | Hold firmly and do not strike uncontrolled on hard surfaces. |
Bill of Materials
Bill of Materials (BoM) helps estimate costs in advance and avoid waste by buying only what is needed.
Estimating Number of Bricks Required
- Bricks are available in different types such as clay bricks, fly ash bricks and concrete bricks.
- In India, the standard brick size is 190 × 90 × 90 mm.
- An additional 10 mm is considered for mortar while calculating, so the effective size of a brick is taken as 200 × 100 × 100 mm.
- To calculate the number of bricks required for construction, first the volume of the structure is found.

Figure: Drawing of a ramp with dimensions
For example, if a ramp is to be constructed, the area of the triangular section is calculated as
Volume of construction = Area of Triangle (ramp) × width Area of triangle (ramp)
= ½ × base × height = ½ × 1.5 × 2
= 1.5 m2
Width of ramp = 1.5 m
So, Volume = 1.5 × 1.5 = 2.25 m3
As per the rule of thumb, 1 m3 of construction requires about 500 bricks.
Therefore, for 2.25 m3
Number of bricks = 2.25 × 500 = 1125 bricks
To cover wastage during construction, 10% extra bricks are added:
10% of 1125 = 112 bricks (approx.)
So, total bricks required = 1125 + 112 ≈ 1200 bricks
Estimate for Mortar
- Mortar is a mixture of sand, cement and water and the sand used must be clean and free from clay and dust.
- Mortar is used for plastering, brickwork, construction of walls and repair work.
- The ratio of cement to sand varies depending on the type of construction work.
- By rule of thumb, to lay 100 bricks, about 5-10 kg of cement is used for a 1:4 mortar ratio.
- Volume helps in estimating the number of materials needed for construction.
- Each brick has a fixed volume. Total number of bricks is calculated by comparing structure volume with brick volume.
- Extra 10% bricks are added to account for breakage and cutting.
- In India, bricks are typically made as per the specifications of the Bureau of Indian Standards (BIS), the body that maintains standards across products.

Figure: Dimensions of a typical brick in India are 190 × 90 × 90 mm
Ratio of Cement and Sand to Make Mortar for Different Kinds of Construction Work
| Use of Mortar | Ratio (Cement: Sand) |
| Brick masonry | 1 : 3 |
| RCC (Reinforced Cement Concrete) | 1 : 2 |
| General repair and maintenance | 1 : 3 to 1 : 6 |
Cost of Labour
- In addition to the actual cost of materials, the cost of labour must also be calculated.
- The cost of labour includes the estimated time spent in completing the tasks.
Sample Bills of Material

Minor Repair and Maintenance
- Before the main project, practice making and using mortar by doing minor repairs around the school.
- Look for broken tiles, damaged walls, broken ramps, fencing or small walls that need fixing.
Steps for Minor Repair
- Step 1: Mix one part cement and three parts sand.
- Step 2: Add water slowly to make a smooth, thick paste.
- Step 3: Clean the surface, sprinkle water, then apply mortar on cracks, joints or tiles using a trowel.
- Step 4: Press, level and smoothen the applied area.
Curing and Drying
- Curing is the process of keeping mortar or concrete wet for 14-28 days after application to make the bond stronger.
- It helps complete the chemical reaction between water and mortar and should continue for 14-28 days.
- For minor repairs, mortar should be left for 24 hours and then lightly sprinkled with water for 14-28 days.
- Curing can be done using wet jute or gunny bags or by sprinkling water through pipes, sprinklers or mugs.
Making a Structure
- Making a structure involves constructing a selected model or project with proper planning and guidance.
- It includes selecting materials, using suitable tools and following correct steps to build the structure safely and accurately.
Preparation
Preparation of construction begins with the following steps
- Preparing Ground: Preparation begins by cleaning the construction site and removing grass, loose soil and dust. Water is sprinkled on the ground to settle dust and make the surface suitable for construction.
- Marking on Ground: The boundary of the structure is marked on the ground using a metre tape and a pointed stick. This helps in setting the correct dimensions of the structure.
- Making the Foundation: A proper foundation is prepared by ensuring the ground is flat and the soil is firm. Tools like a spirit level and water level tube are used to check the level of the ground and extra soil is removed if needed.
- Putting a Reference Line for Bricks on Ground: Reference lines are marked on the levelled surface using string or chalk lines. This ensures correct alignment, length and orientation before laying the bricks.

Figure: (a) Using reference lines for marking site of construction, and (b) marking lines for construction
Preparing and Laying Bricks
- Soak bricks in water for a minimum of 6-12 hours before use. Dry bricks absorb water from mortar, weakening it.
- Place bricks in the selected bond pattern, then apply mortar between them.
- For non-rectangular structures (like ramps), cut bricks to the required shape using a chisel and hammer under expert supervision.
- Ensure there are no gaps or protruding edges in the structure.

Types of Brick Bonds
There are four types of brick bonds which are
- Stretcher Bond: Bricks are laid with their length facing outward. It is used for boundary walls, partitions and half-brick thick walls,
- Header Bond: Bricks are laid with their width facing outward. ¡t is used for thick walls and curved walls.
- English Bond: Alternate rows of stretcher and header bonds are arranged. it is one of the strongest bonds and is used for load-bearing Structures.
- Flemish Bond: Stretcher and header bricks are arranged alternately in the same row. It provides strength and an attractive appearance.

Ensuring Proper Alignment in Construction
- Proper alignment is important because it helps transfer the load of a structure safely to the ground and maintains its strength and stability.
- If a structure is not properly aligned, gravity can weaken it and affect its safety.
- Plumb bob is used to check whether a structure is vertical or perpendicular to the ground.
- Spirit level is used to check whether a surface is horizontal or parallel to the ground.
- Water level tube is used to ensure that two points at a distance are at the same height.

Figure: (a)Plumb bob must hang parallel to the ground;
(b) bubble in spirit level tube must be at the centre; and
(c) level in water level tube must be the same at all points of the structure
Plastering
Plastering is the process of applying a smooth coating of plaster on a wall. It increases durability, protects the wall from moisture and heat and gives the surface a neat finish.
Steps for plastering are given below
- Prepare the Surface: Clean the wall with a wire brush to remove debris and lightly dampen the surface.
- Make the Plaster Mix: Prepare a mixture of cement and fine sand in a ratio of 1:6 for external walls, and 1:4 for internal walls. Add water gradually to make a thick mix that does not slide off the wall.
- Apply the Plaster First: apply a base coat and allow it to set, then apply a second coat. The plaster thickness is usually 12-15 mm.
- Finish the Surface: Use a finishing tool and trowel to give the plaster a smooth texture.
- Cure the Plaster: Spray water regularly for several days to help the plaster gain strength.

Trowel/Thappa/Karni: It is used to apply and flatten the plaster.
Float: It is used to fltten the plaster.
Wire Brush: For cleaning
Figure: Applying plaster on the wall
Figure: Plastering of a wall
Painting and Finishing the Surface
Painting makes walls look neat and attractive. It also prevents leakages, protects against pest attack and increases the life of the structure.
Different Types of Paints used in India
| Type of Paint | Applications | Advantages |
| Whitewash (Lime wash) | Houses, temporary structures, ceilings, low-cost housing | Very cheap, antibacterial, reflects heat, eco-friendly |
| Distemper | Interior walls and ceilings in low-cost buildings | Economical, easy to apply, many colours, breathable |
| Cement Paint | Exterior walls, boundary walls, basements, damp areas | Water-resistant, prevents fungus/mildew, durable outdoors |
Steps to Apply Cement Paint
The following are the steps to apply cement paint
- Surface Cleaning: Clean the ramp properly by removing dust, loose cement, sand, grease and old paint using a
brush, broom or water. A clean surface helps the paint stick well. , - Wetting the Surface: Sprinkle clean water on the ramp before painting. Cement paint should be applied on a slightly wet surface for proper bonding.
- Preparing the Paint: Mix the cement paint with water according to the instructions on the packet. Stir well to make a smooth, lump-free mixture.
- Applying the First Coat: Apply the first coat with a brush or roller, moving evenly in one direction for a smooth finish.
- Curing the First Coat: Let the first coat dry for at least 24 hours and lightly sprinkle water on it during this time for proper setting.
- Applying the Second Coat: After the first coat dries, apply the second coat in the same way. This improves colour, strength and water resistance.
- Final Drying and Safety Check: Allow the paint to dry for 48-72 hours before using the ramp. Place a “Wet Paint – Do Not Use” sign to prevent accidents.
- Post-Construction Cleaning: Clean the area around the construction site, remove waste materials and store unused materials properly to keep the site safe and tidy.
Important Points to Keep in Mind During Construction
- Observe and learn before starting the work by visiting construction sites, searching online or consulting experts.
- Take expert guidance to decide the foundation depth according to the weight of the structure and the type of soil.
- Use tools such as a water level tube, spirit level and plumb bob to ensure the structure is properly aligned.
- Soak bricks for 6-12 hours before use and prepare mortar and concrete in the correct proportions for strong construction.
- Cure the structure by spraying water regularly for 14-28 days after applying mortar or concrete to gain strength.
- Prevent the construction from drying out and keep the surroundings clean by removing debris, sand and cement after completion.
- Paint the structure after construction to make it attractive and increase its durability.
The post Construction Class 9 Notes Kaushal Vikas Chapter 6 appeared first on Learn CBSE.
from Learn CBSE https://ift.tt/7XOWM3Z
via IFTTT

No comments:
Post a Comment